Showing posts with label Kona Club Challenge. Show all posts

Thursday, October 22, 2015

Kona Club Challenge - Tea Room Table Topper by Shena from Apple Pie Patchwork

We're delighted to have Shena from Apple Pie Patchwork take the Kona Club Challenge this month! Shena does gorgeous work and has won awards for her quilts! Make sure you follow her blog for more tutorials and inspiration! 

Shena used the colors we sent out in April 2015 for Kona Club for her project today. We hope you enjoy this tutorial and make your own table topper. We are giving away the fat quarters that Shena used in this tutorial so be sure to leave a comment on this post to win!


Tea Room Table Topper

Hello! My name is Shena and I typically blog at Apple Pie Patchwork. I live in Lethbridge, Alberta, and I'm a founder and the president of the local MQG. I was contacted by Sew Sisters and asked to write a tutorial for a project that could be made using one of their Kona Club packs. Eventually I settled on this table topper. I was inspired by a window that I saw in an older local building that is now a tea room, and decided to try and re-create it.

071

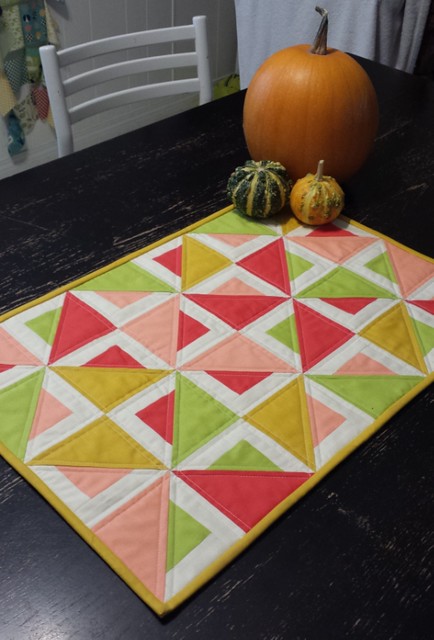
This is actually a very simple project to put together. It finishes at 16"x24" and is made with HSTs.

Ready to get started? This is the Kona Club pack I chose and picked the Kona Bone to go with it. The colours are, from left to right, Kona - Creamsicle, Kona - Watermelon, Kona - Limelight, and Kona - Grellow.


029

Cutting Instructions:


Begin with cutting the Kona Bone: Cut 10 (ten) 1.5"x21" strips. Subcut 6 (six) strips into 24 (twenty-four) 1.5"x5" rectangles Subcut 4 (four) strips into 24 (twenty-four) 1.5"x3" rectangles 

Then you have to decide which of the four remaining colours you would like to use as your binding. I chose Grellow. You will cut only one strip from this fabric. Pay close attention to the way you orient the fabric as you cut, to ensure that you have enough left over for your binding. 

From the Kona Grellow cut: 1 (one) strip 5"x18" (make sure to cut the 18" length, NOT the 21" length) Subcut this strip into 3 (three) 5" squares Your remaining piece should measure approximately 16"x18" From this piece cut: 7 (seven) strips 2.5"x16" for binding. Set aside for now. 

Now layer the three remaining colours - Creamsicle, Watermelon, and Limelight. Again, watch the orientation to ensure you cut the correct length. Otherwise you will not have enough leftover for your backing. 

From each of Creamsicle, Watermelon, and Limelight cut: 1 (one) strip 5"x18" Subcut this strip into 3 (three) 5" squares 1 (one) strip 3"x18" Subcut this strip into 4 (four) 3" squares Your leftover pieces should measure approximately 13"x18". Set these aside for backing.


034


After you are done cutting, this is what you should have. Binding strips not pictured. 

Sewing Instructions:

Take your 3" squares and sew a 1.5"x3" strip to each side. Press open. 
Take your 5"x1.5" strips and sew them to the top and bottom of your unit. Press open.

035

Your unit should now measure 5". Take the 5" square that you cut from Watermelon, Creamsicle, and Limelight.
Mark the centre diagonal and layer RST with your 5" units. Stitch 1/4" away from the marked line on each side.
Cut on the marked line and press the HSTs towards the dark fabric.

039

040

Square up to 4.5" Arrange 4 HSTs into a pinwheel shape to make your block. 
Stitch together with a 1/4" seam. Make 6 (six) blocks. Blocks should measure 8.5".


043

Lay your blocks out in a 2x3 layout. Stitch together with a 1/4" seam. 
Your top should measure 16.5"x24.5".


045

Find your leftover pieces of Watermelon, Creamsicle, and Limelight. Choose 2 of them and stitch them together to make a backing measuring approximately 18"x 26". 
Baste and quilt as desired. I used a walking foot to straight stitch 1/4" away from each long seam line. It made beautiful stars in the centres of the pinwheels. 

Bind with the 2.5" strips of Grellow.


068

070

And that's it! You're done! 
Enjoy your beautiful new table topper! I hope you enjoyed this project. 
Thanks for stopping by!


071


Giveaway!

You could win 4 fat quarters of the Kona Cotton Solids Shena used in this project!

Just leave a comment on this post for a chance to win.


If you are no-reply/Wordpress blogger please leave your email id in the post.
We will leave the giveaway open till Monday, October 26.
Winner will be announced Tuesday, October 27.

Good luck! 
Many thanks to Shena from Apple Pie Patchwork for this great tutorial!

Click here for more details on Kona Club. 

Thursday, September 24, 2015

Kona Club Challenge: Binder Cover by Cathy from Cathy's Blueberry Patch

We're so excited to have Cathy  from Cathy's Blueberry Patch take the Kona Club Challenge this month! Cathy is a prolific quilter and she does it all while she works full time! It's been a pleasure meeting and getting to know Cathy in blogland and we're so happy to feature her on Kona Club Challenge.

Cathy used the colors we sent out in August 2014 for Kona Club for her project today. We hope you enjoy this tutorial and make your own Binder Cover! We are giving away the fat quarters that Cathy used in this tutorial so be sure to leave a comment on this post to win!

Binder Cover


Hello!  My name is Cathy Erickson and I blog at Cathy's Blueberry Patch.  I work full time as an elementary school principal so I like to say I am a weekend quilter.  I am married to a very patient man who knows how to build awesome cabinets for all my fabric!  We have 2 married children and live on a small blueberry farm.I have been quilting in a big way for the last four years but have been sewing since I was very young.  I call myself a modern quilter.  I love fabric and I am a huge fan of Kona solids.

I decided to make something a little different for this project.  It would make a great gift for someone else but it might also be something you might like to make for yourself!


Supplies:
All seams are 1/4"

Cutting Instructions:


Decide which Kona FQ will be your feature colour for the outside binder cover and cut:
    • Two 8" x 13.5"main cover
From the 3 remaining FQs cut:
    • Two 8" x 13.5" inside flaps
    • Two 8" x 13.5" inside flap lining
    • Two 6.75" x 8" inside flap pockets
    • Ten 2" x 8" spine pieces assorted colours
    • Two 2.5" x 8" inside pocket top edge from a colour which contrasts from the pocket


Sewing Instructions:

Arrange the pieces for the binder spine in a pleasing order and stitch together.  Press the seams to one side.  Centre the spine section to the front cover pieces and stitch as shown in the photo.  Trim the top edge of the spine section.  Place the outside binder cover on your batting, baste as desired and quilt as desired. I like straight lines and lots of them!


Press down 1/4" the long side of the pocket top edge.  Stitch pocket top edge to pocket.
Press seam towards pocket top edge.


Press pocket top edge towards the pocket, covering the seam.
Top stitch close to the edge, encasing the seam. Repeat for second pocket.


Layer your flap pieces in this order - Inside flap, pocket, inside flap lining and finally batting scrap measuring 8" x 13.5".


Stitch flap to flap lining, making sure you have inside flaps which are mirror images of each other as in the picture below.  Trim batting from seam allowances, press and top stitch edge. Nice!


Stitch flaps to main binder cover.  Again, trim excess batting from seam allowance and press.  At this point test the fit of your binder in your cover.  You want there to be some looseness as the top stitching at the end will also reduce the amount of wiggle room. Trim your binder cover to measure 12.5".


With right sides together, stitch top and bottom edge of flaps to outside binder cover.  Trim batting from seam allowance.  Trace the rounded corners of the binder on all 4 corners and stitch a curved corners.  Trim seams and turn to right side.  Press carefully.  At this point, you may wish to place lining on the inside of the binder cover.  Slip stitch to top and bottom inside binder encasing upper and lower bottom edge.  This is completely optional.  Otherwise, press spine of binder top and bottom edge to the inside.  Top stitch carefully around the entire outside of the binder cover.  I added a second row of stitching to secure the seam at spine edges.


 And there it is!  A lovely covered binder to store all your patterns and notes in.


Giveaway!
You could win 4 fat quarters of the Kona Cotton Solids Cathy used to make her Binder Cover.
Just leave a comment on this post for a chance to win.

If you are no-reply/Wordpress blogger please leave your email id in the post.
We will leave the giveaway open till Monday, September 28.
Winner will be announced Tuesday, September 29.

Good luck everybody and enjoy making your very own Binder Cover!
Many thanks to Cathy  from Cathy's Blueberry Patch for this great tutorial.

Click here for more details on Kona Club. 


Friday, August 21, 2015

Kona Club Challenge - Tropical Spin by Sandy from Upstairs Hobby Room


We're delighted to have Sandy from Upstairs Hobby Room take the Kona Club Challenge this month! Sandy has a great blog with lots of interesting projects, sew alongs, and giveaways! 

Sandy used the colors we sent out in February 2015 for Kona Club for her project today. We hope you enjoy this tutorial and make your own umbrella skirt for your patio table. We are giving away the fat quarters that Sandy used in this tutorial so be sure to leave a comment on this post to win!
Hi everyone, I'm Sandy from Upstairs Hobby Room! I'm a wife to my high school sweetheart, though we lived in different towns and didn't attend the same school. We just celebrated our 30th Wedding anniversary in July!  I'm a mother of 3 grown adults, a daughter and 2 sons, plus a son-in-law (no grand babies, yet), and I love country living. I have always loved crafting and creative outlets, and have sewn since I was about 11 or 12 years old, but I have only recently started quilting, about 3 ish years now.

I was super excited to be asked to join in on the Kona Club Challenge. I love Kona Cottons and I enjoy a good sewing challenge!!  I think I am still at the sponge stage, absorbing every new thing I can try, lol. Hope you are excited about the project and will try one for yourself, or maybe as BBQ host/hostess gift.  Happy sewing!

Tropical Spin


Wednesday, June 24, 2015

Kona Club Challenge Giveaway Winner!

The Winner of the Kona Club Challenge - Giveaway is:

--------------------------------------------------------------------
5. Dolores said...
I follow Brenda's blog and I have that Seminole book too. I'd love to win some solids and make a small Seminole project.
---------------------------------------------------------------------------

Congratulations Dolores!

Friday, June 19, 2015

Kona Club Challenge - French Press Wrap and Mug Rug by Brenda from Scraps and Strings

We're so happy to have Brenda  from Scraps and Strings take the Kona Club Challenge this month! Brenda has many beautiful projects on her blog so make sure you follow her for more ideas and inspiration!

Brenda used the colors we sent out in January 2014 for  Kona Club for her project today. We hope you enjoy this tutorial and make your own French Press Wrap and Mug Rug!

We are giving away the fat quarters that Brenda used in this tutorial so be sure to leave a comment on this post to win!


Tuesday, January 27, 2015

Kona Club Challenge - Flowering Table Runner by Lorna from Sew Fresh Quilts

Lorna from Sew Fresh Quilts took the Kona Club Challenge this month and made a beautiful table runner. Lorna is a prolific quilter and talented designer. Her blog is a treasure trove of projects, inspiration, tutorials and more! Make sure you follow her on Sew Fresh Quilts.

Lorna used the colors we sent out in April 2014 for Kona Club for her project today. We hope you enjoy this tutorial and make one of your own. We are giving away the fat quarters that Lorna used in this tutorial so be sure to leave a comment on this post to win!

Flowering Table Runner


Hello Kona Quilting Cottons lovers!  Are you up for the Kona Challenge?

My name is Lorna McMahon, a modern quilter, designer and the author of Sew Fresh Quilts.  Today I will be sharing the results of my Kona Challenge project and an easy tutorial for the Flowering Table Runner.   6 Blocks result in a finished runner approximately size 12” x 58”


Flowering Table Runner - 12" x 58"

Friday, August 29, 2014

Kona Club Challenge - Giveaway Winner!

The Winner of the Kona Club Challenge - Giveaway is:

--------------------------------------------------------------------
5. Briarose said...
what a great tutorial, I'm going to make one for my grandson. Thanks! He'll love it. Claire
---------------------------------------------------------------------------


Tuesday, August 26, 2014

Kona Club Challenge - Boxy Pouch by Jennifer

 We're so happy to have Jennifer from A Quarter Inch from the Edge take the Kona Club Challenge this month. Jenn is a member of the Kona Club and love's solids. Jennifer used the colors we sent out in June 2013 for  Kona Club and made this great Boxy Pouch. We hope you enjoy this tutorial and make one of your own. We are giving away the fat quarters that Jennifer used in this tutorial so be sure to leave a comment on this post to win!

Don't forget to follow A Quarter Inch from the Edge for more inspiration and great projects!

Hi! I’m Jenn from A Quarter Inch from the Edge. I’ve been quilting for fourteen years and blogging about it for two! My blog, which began as a New Year’s Resolution, combines my love of writing, taking photos, and of course, quilting.  I live in Dartmouth, Nova Scotia and am a member of the newly formed Maritime Modern Quilt Guild. When I’m not quilting, I’m a Middle School French teacher and a life-long Girl Guide. I love Kona solids to the point of distraction and am so pleased to have been given the opportunity to write a tutorial for the Kona Club Challenge. I’ve been a member of Sew Sisters’ monthly Kona Club since January 2013 and love tearing into that squishy envelope every month to see what treasures await.

Friday, May 23, 2014

Kona Club Challenge - Tulip Tower Table/Sewing Machine Topper by Felicity

We're so excited to have Felicity from Felicity Quilts posting today! Felicity took the Kona Club Challenge this month. Felicity used the colors we sent out in March 2014 for  Kona Club and made this great Tulip Tower Table/Sewing Machine Topper! We hope you enjoy this tutorial and make one of your own! We are giving away the fat quarters that Felicity used in this tutorial so be sure to leave a comment on this post to win!

Don't forget to follow Felicity Quilts for more inspiration and great projects!

Tulip Tower Table/Sewing Machine Topper

Hi there - I'm Felicity and I blog over at Felicity Quilts. I was so happy when Sew Sisters - my favourite online fabric shop - approached me to participate in the Kona Club Challenge!

I was totally inspired by the photograph that accompanied the March 2014 Kona Club bundle - aren't those beautiful tulips? I created a mini quilt that features four graphic tulips, and my daughter declared its name Tulip Tower!

This 16½" x 24½" mini quilt can be a table topper, wall hanging or a machine topper.


Monday, April 14, 2014

Kona Club Challenge - Divided Tote by Rebecca

Rebecca from Our Busy Little Bunch, took the Kona Club Challenge this month. Rebecca used the colors we sent out in February 2014 for  Kona Club and made this great Divided Tote! We hope you enjoy this tutorial and make one of your own! We are giving away the fat quarters that Rebecca used in this tutorial so be sure to leave a comment on this post to win!

Don't forget to follow Our Busy Little Bunch for more inspiration and great projects!


Friday, January 24, 2014

Kona Club Challenge - Boxed Zip Pouch by Katrina

Katrina from Nizhoni Workshop, took the Kona Club Challenge this month. Katrina used the colors we sent out in November 2013 for  Kona Club and made this fun Boxed Zip Pouch. We hope you enjoy this tutorial and make one of your own! We are giving away the fat quarters that Katrina used in this tutorial so be sure to leave a comment on this post to win!


Boxed Zip Pouch


Katrina Hertzer of Nizhoni WorkshopHi! I'm Katrina from Nizhoni Workshop, the small blog where I share my projects. I'm a mother of three young children and I love to sew and create. My passion is patchwork and I'm a member of the Calgary Modern Quilt Guild. I love bold pattern on pattern, anything Tula Pink and am currently in love with medallion-style quilts. I enjoy creating designs which incorporate my Navajo heritage and love of modern quilting.

Today I'd like to show you my method of creating a boxed zip pouch. There are many ways to achieve a similar result and I won't be recreating the wheel. This is simply my way of sewing that takes minimal effort to achieve a great result.

Boxed Zip Pouch Tutorial by Nizhoni Workshop

Friday, October 11, 2013

Kona Club Challenge - Candy Dish Tutorial by Stacey Day


Stacey from Stacey in Stitches took the Kona Club Challenge this month.  Stacey used the colors we sent out in December 2012 for Kona Club and made this fun Candy Dish. We hope you enjoy this tutorial and make one of your own!

We are giving away the fat quarters that Stacey used in this tutorial so be sure to leave a comment on this post to win!

Candy Dish 

Hi, I’m Stacey from over at Stacey in Stitches. I am very excited to be a guest here at Sew Sisters, to share my Candy Dish tutorial! I live in Beautiful British Columbia with my husband, son, and slightly neurotic cat. I have been quilting and sewing since I was about 6. My grandma and mom taught me almost everything I know, and instilled a love of art in me that manifests itself in quilting. I have my diploma in Fashion Production from Olds College, and I dabble in knitting, crochet, and watercolour. I started blogging last year when my son was born, and I am so inspired by the myriad of talented quilters and fiber artists out there! I am also a member of the Vancouver Modern Quilt Guild.

It’s that time of year again when the stores start selling a yummy assortment of candy and snack size chocolates bars in preparation for the holiday season that kicks off at Halloween and doesn't stop until just after New Year's. With all the entertaining to be done, why not keep the crystal in the cupboard and show off your superb sewing skills with a set of quilted candy dishes? They are easy to make and give away as gifts, and can be made for every candy-filled holiday throughout the year, from Halloween and Christmas, to Valentines Day and Easter. The template can be enlarged or shrunk for a great variety of sizes, and you can utilize some of the fancy stitches on your machine to sew wedges together.


Friday, September 13, 2013

Kona Club Challenge - Ballet Tote by Krista from Poppyprint

Krista from Poppyprint took the Kona Club Challenge this month. Krista used the colors we sent out in April 2013 for Kona Club and made this adorable Ballet Tote. We hope you enjoy this tutorial and make one of your own!

We are giving away the fat quarters that Krista used in this tutorial so be sure to leave a comment on this post to win!

Krista Hennebury sews and quilts in her little home studio in North Vancouver. She began quilting 12 years ago as a creative outlet after her two children came along.  She blogs at www.poppyprintcreates.blogspot.com sharing tutorials and travel photography, teaches workshops, runs a popular day-retreat business and is an active member of the Lions Gate Quilters Guild and the Vancouver Modern Quilt Guild. Her work has appeared in Quilters Connection, Fat Quarterly and Stitch magazines as well as Modern Quilt Blocks. She's currently working on an e-book sharing her knowledge with others who wish to start a retreat business in their community.

Ballet Tote

Finished size 8" x 12" x 2"
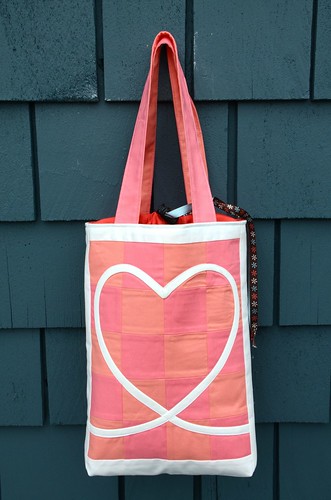
It's not just back to school this fall - it is back to ballet, too! Send your ballerina off in style with this sweet Ballet Tote featuring Sew Sisters' lovely April Kona Solids FQ set.  I designed this tote with my sister and nieces in mind; they've recently taken over Demi Pointe, a dance shop in Charlottetown, PEI. I've adapted a machine applique technique by Karen Soltys in "Applique Made Easy" from Rodale to make the scripted heart.  If the applique is too daunting, just skip it, or add a fusible appliqued monogram instead!

Ballet Tote Tute by Poppyprint

Please read through the tutorial and have a look at the photos prior to cutting or sewing anything!