Showing posts with label Robert Kaufman. Show all posts

Saturday, February 13, 2016

Tuesday, February 2, 2016

Carkai is Here!!!


Carkai is Carolyn Friedlander's fourth and latest collection for Robert Kaufman. Inspired by bones this is a playful collection with lots of possibilities. We've also brought in some of Carolyn's basics from Architextures and Doe to complement Carkai. 
100% Cotton. 42"-44" Wide.

Click here to purchase: Carkai by Carolyn Friedlander


Thursday, September 24, 2015

Kona Club Challenge: Binder Cover by Cathy from Cathy's Blueberry Patch

We're so excited to have Cathy  from Cathy's Blueberry Patch take the Kona Club Challenge this month! Cathy is a prolific quilter and she does it all while she works full time! It's been a pleasure meeting and getting to know Cathy in blogland and we're so happy to feature her on Kona Club Challenge.

Cathy used the colors we sent out in August 2014 for Kona Club for her project today. We hope you enjoy this tutorial and make your own Binder Cover! We are giving away the fat quarters that Cathy used in this tutorial so be sure to leave a comment on this post to win!

Binder Cover


Hello!  My name is Cathy Erickson and I blog at Cathy's Blueberry Patch.  I work full time as an elementary school principal so I like to say I am a weekend quilter.  I am married to a very patient man who knows how to build awesome cabinets for all my fabric!  We have 2 married children and live on a small blueberry farm.I have been quilting in a big way for the last four years but have been sewing since I was very young.  I call myself a modern quilter.  I love fabric and I am a huge fan of Kona solids.

I decided to make something a little different for this project.  It would make a great gift for someone else but it might also be something you might like to make for yourself!


Supplies:
All seams are 1/4"

Cutting Instructions:


Decide which Kona FQ will be your feature colour for the outside binder cover and cut:
    • Two 8" x 13.5"main cover
From the 3 remaining FQs cut:
    • Two 8" x 13.5" inside flaps
    • Two 8" x 13.5" inside flap lining
    • Two 6.75" x 8" inside flap pockets
    • Ten 2" x 8" spine pieces assorted colours
    • Two 2.5" x 8" inside pocket top edge from a colour which contrasts from the pocket


Sewing Instructions:

Arrange the pieces for the binder spine in a pleasing order and stitch together.  Press the seams to one side.  Centre the spine section to the front cover pieces and stitch as shown in the photo.  Trim the top edge of the spine section.  Place the outside binder cover on your batting, baste as desired and quilt as desired. I like straight lines and lots of them!


Press down 1/4" the long side of the pocket top edge.  Stitch pocket top edge to pocket.
Press seam towards pocket top edge.


Press pocket top edge towards the pocket, covering the seam.
Top stitch close to the edge, encasing the seam. Repeat for second pocket.


Layer your flap pieces in this order - Inside flap, pocket, inside flap lining and finally batting scrap measuring 8" x 13.5".


Stitch flap to flap lining, making sure you have inside flaps which are mirror images of each other as in the picture below.  Trim batting from seam allowances, press and top stitch edge. Nice!


Stitch flaps to main binder cover.  Again, trim excess batting from seam allowance and press.  At this point test the fit of your binder in your cover.  You want there to be some looseness as the top stitching at the end will also reduce the amount of wiggle room. Trim your binder cover to measure 12.5".


With right sides together, stitch top and bottom edge of flaps to outside binder cover.  Trim batting from seam allowance.  Trace the rounded corners of the binder on all 4 corners and stitch a curved corners.  Trim seams and turn to right side.  Press carefully.  At this point, you may wish to place lining on the inside of the binder cover.  Slip stitch to top and bottom inside binder encasing upper and lower bottom edge.  This is completely optional.  Otherwise, press spine of binder top and bottom edge to the inside.  Top stitch carefully around the entire outside of the binder cover.  I added a second row of stitching to secure the seam at spine edges.


 And there it is!  A lovely covered binder to store all your patterns and notes in.


Giveaway!
You could win 4 fat quarters of the Kona Cotton Solids Cathy used to make her Binder Cover.
Just leave a comment on this post for a chance to win.

If you are no-reply/Wordpress blogger please leave your email id in the post.
We will leave the giveaway open till Monday, September 28.
Winner will be announced Tuesday, September 29.

Good luck everybody and enjoy making your very own Binder Cover!
Many thanks to Cathy  from Cathy's Blueberry Patch for this great tutorial.

Click here for more details on Kona Club. 


Friday, August 21, 2015

Kona Club Challenge - Tropical Spin by Sandy from Upstairs Hobby Room


We're delighted to have Sandy from Upstairs Hobby Room take the Kona Club Challenge this month! Sandy has a great blog with lots of interesting projects, sew alongs, and giveaways! 

Sandy used the colors we sent out in February 2015 for Kona Club for her project today. We hope you enjoy this tutorial and make your own umbrella skirt for your patio table. We are giving away the fat quarters that Sandy used in this tutorial so be sure to leave a comment on this post to win!
Hi everyone, I'm Sandy from Upstairs Hobby Room! I'm a wife to my high school sweetheart, though we lived in different towns and didn't attend the same school. We just celebrated our 30th Wedding anniversary in July!  I'm a mother of 3 grown adults, a daughter and 2 sons, plus a son-in-law (no grand babies, yet), and I love country living. I have always loved crafting and creative outlets, and have sewn since I was about 11 or 12 years old, but I have only recently started quilting, about 3 ish years now.

I was super excited to be asked to join in on the Kona Club Challenge. I love Kona Cottons and I enjoy a good sewing challenge!!  I think I am still at the sponge stage, absorbing every new thing I can try, lol. Hope you are excited about the project and will try one for yourself, or maybe as BBQ host/hostess gift.  Happy sewing!

Tropical Spin


Thursday, August 20, 2015

Essex Linen!

http://store.sew-sisters.com/stores_app/Browse_dept_items.asp?Store_id=807&Page_id=17&categ_id=727&parent_ids=0,3&name=Essex+Linen+%28New%29

We've brought in some Essex Linen from Robert Kaufman. These beautiful linen cotton blends are great for apparel, quilting and all kinds of projects. We especially like them for little zipper pouches, place mats, and bags. 

Essex Linen is from Robert Kaufman's House of Linens that produces a range of quality fashion linen-cotton blends. You can use these linen-cotton blends for apparel, home decor, quilting and more!
Please note that these fabrics are a linen-cotton blend.

Click here to purchase: Essex Linen

Friday, July 10, 2015

SALE! 25% Off Doe! Only in July


Get 25% Off Carolyn Friendlander's Doe this month.
Offer is valid until July 31 or while supplies last.
Don't wait to shop!
Click here to purchase: Doe on Sale

Saturday, November 23, 2013

And we're home!


Wow! Is the week over already? Hasn't it been an amazing time?
Thank You to everyone who took part in Blogathon Canada - all our hosts, our co-sponsors, and everyone who hopped across the country with us! We were so happy to see so many of you back from last year and meet so many participating for the first time. We appreciate all your wonderful comments. Thank You for making this week so much fun!

Wednesday, November 20, 2013

Blogathon Canada in Alberta!

We've had a lot of fun visiting BC and the Maritimes over the last two days and now we're visiting Alberta! There are so many amazing quilting bloggers in this province that we're sure you'll enjoy visiting! Meet our fantastic hosts and lovely quilting bloggers from Alberta.

Monday, November 11, 2013

Calling Canadian Quilters - Last Chance to Link Up!


Are you a quilting blogger in Canada?
Then be sure to link up to Blogathon Canada - an all Canadian, week long, blog hop of Canadian quilting blogs! Write to us at connect@sew-sisters.com before Thursday November 14 and we will add your blog to the list.

Meet talented quilters and win amazing prizes!

Go here for all the details: Blogathon Canada

This year we have a special treat for you! Not only can you win prizes from our store on the host bloggers blogs, you can also enter giveaways on our blog during Blogathon week!
These prizes are sponsored by our fabulous co-sponsors:


Friday, October 4, 2013

New Kona Colors!


Don't the new Kona Colors make you happy? Lots of beautiful grays, blues, and oranges to choose from.
We’ve added the new colors to our shelves so get them all!
Click here to purchase: New Kona Cotton Solids
We have a limited number of Kona Solids - Roll Ups on sale. Click here to check them out: Kona Solids - Roll Ups on Sale.

Friday, September 13, 2013

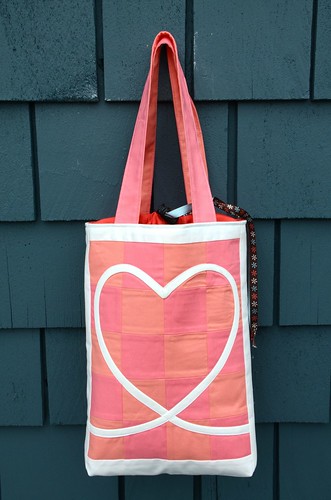
Kona Club Challenge - Ballet Tote by Krista from Poppyprint

Krista from Poppyprint took the Kona Club Challenge this month. Krista used the colors we sent out in April 2013 for Kona Club and made this adorable Ballet Tote. We hope you enjoy this tutorial and make one of your own!

We are giving away the fat quarters that Krista used in this tutorial so be sure to leave a comment on this post to win!

Krista Hennebury sews and quilts in her little home studio in North Vancouver. She began quilting 12 years ago as a creative outlet after her two children came along.  She blogs at www.poppyprintcreates.blogspot.com sharing tutorials and travel photography, teaches workshops, runs a popular day-retreat business and is an active member of the Lions Gate Quilters Guild and the Vancouver Modern Quilt Guild. Her work has appeared in Quilters Connection, Fat Quarterly and Stitch magazines as well as Modern Quilt Blocks. She's currently working on an e-book sharing her knowledge with others who wish to start a retreat business in their community.

Ballet Tote

Finished size 8" x 12" x 2"
It's not just back to school this fall - it is back to ballet, too! Send your ballerina off in style with this sweet Ballet Tote featuring Sew Sisters' lovely April Kona Solids FQ set.  I designed this tote with my sister and nieces in mind; they've recently taken over Demi Pointe, a dance shop in Charlottetown, PEI. I've adapted a machine applique technique by Karen Soltys in "Applique Made Easy" from Rodale to make the scripted heart.  If the applique is too daunting, just skip it, or add a fusible appliqued monogram instead!

Ballet Tote Tute by Poppyprint

Please read through the tutorial and have a look at the photos prior to cutting or sewing anything!

Wednesday, August 28, 2013

Fat Quarter Frenzy!


This is a one time sweet deal! For three days only get gorgeous fat quarters from Robert Kaufman for only $2.00!
Go here for a sneak peak and come back tomorrow to shop!
Fat Quarter Frenzy!

Friday, August 23, 2013

New on the Shelves!


Petal Pushers

Petal Pushers by Whistler Studios is a lovely collection overflowing with a fun array of flowery patterns. This collection will electrify you with its lush combination of bright pinks, greens and blues. Use Petal Pushers to make a cheery quilt, fun dress or a vibrant tote bag.
Click here to purchase: Petal Pushers for only $9.99/metre

Rustling Leaves

Cheryl Hayne's Rustling Leaves collection is inspired by Fall. Shades of burnished gold and copper against a rich palette of earthy reds, oranges and greens. This fabric has an entire host of autumn textures and shades. It's a wonderful way to bring the season indoors.
Click here to purchase: Rustling Leaves for only $10.99/metre


New Geometric Prints

We've got fun geometric prints from Robert Kaufman on the shelves this month.
Click here to purchase: New Geometric Prints

Friday, March 15, 2013

Welcome to the very first Kona Club Challenge Tutorial!


Here it is! The very first Kona Club Challenge Tutorial!

If you haven't read about the Kona Club Challenge it's a little something we started here at Sew Sisters. Since we send delicious Kona Solids each month to our Kona Club members, we thought it would be fun to share tutorials for projects using those solids. 

We approached quilting bloggers from the wonderful blogging universe and "challenged" them to design and create a project and a tutorial using four fat quarters from the Kona Solids we have sent out each month on Kona Club. 


Photo by Glass Eye Photography
Our first Kona Club Challenge went out to Kristie Maslow at OCD: obsessive crafting disorder and she graciously accepted. Kristie has a wonderful blog with lots of great projects, tutorials, and funny stories about her four (including Bailey of course)  gorgeous kids. Her blog always leaves us feeling happy and playful and we're so excited to have her be a guest blogger on the Kona Club Challenge. Kristie also  just had her first, all Canadian Quilt Pattern come out this month. You can find it here: The Good Old Hockey Game Quilt Pattern.

Kristie chose the Kona Solids we sent out in August 2012 and here's what she came up with! Enjoy this fun tutorial and be sure to enter the giveaway at the end of the post. 


Pregnant Mama Doll Tutorial 


 by Kristie Maslow at OCD: obsessive crafting disorder
*for personal use only

When I was asked by Sew Sisters Quilt Shop to participate in the Kona Solids Challenge, I was at a bit of a loss as to what to do.  While I constantly admire the works of others in solids, I find that I tend towards prints myself.  So, given 4 solids to work with and asked to produce a project, I was surprised how quickly inspiration came to me!  Perhaps it was the fleshy tone of the Kona Butter, or the happy Kona Corn Yellow, but immediately I thought they were perfect to make dolls for my daughters.  And then I recalled a "pregnant" doll that I had seen in cyberspace at some point, and I knew exactly what to do!  This doll is perfect for all little girls who what to be like their Moms, and would make the perfect gift for a "big sister" or "big brother" to-be!


The Baby doll tucks up inside under the dress to make the Mama "pregnant"....


You have the option to add Baby to a string (I know my daughters would loose it, otherwise!).


I also added instructions for a little baby sling to help Mama Doll tote Baby around.


The pattern can be modified to create a non-pregnant female doll by omitting the baby and maternity dress, or why not make a little boy doll by also leaving out the buns?  There are many options, choose one to suit you!


Let's get started!

Materials Required:
  • Pattern pieces (Click here to download pdf)
  • A fat quarter each of Kona Cotton Solids in Corn Yellow, Peacock and Navy, and 2 fat quarters or .5 metres of Kona Butter
  • Polyfill
  • Embroidery thread or Pearle 8 thread for facial features
  • Coordinating thread
  • Scraps of paper-backed two-sided iron-on adhesive (I used Pellon Wonder Under)
  • Dye-based ink (for "rosy cheeks", optional)
  • Scrap of yarn or ribbon, approximately 8 inches long (optional)
  • Embellishments such as buttons, lace, etc. (optional)

Instructions:
Notes:
*This pattern can be simplified by omitting the baby and pregnancy option, resulting in a really sweet doll all on its own!
*all seams at 1/4 inch, not the traditional 1/2 inch, because I am a quilter and can't learn new tricks :)
*press all seams to dark colored side

1.  Print out pattern pages with no scaling, using 1 inch boxes provided on each page to ensure they are to size.  Cut all pattern pieces from fabric as required. Instructions for number of pieces to cut are on each piece.  Transfer marks as indicated.  


Iron adhesive to back of front hair piece prior to cutting.


2. Peel paper off hair piece and press onto butter face piece.  Hand or machine stitch  edges to secure.


Note: * the face also needs some stitched personalization, but I waited until the very end to do this so that I could better see the shape of the head to make it look good!


3. Sew 4 shoes to 4 legs.  To make Mary Jane style shoes, cut 2 shoe pieces, 1 inch from top (straight) edge, and insert butter additional piece.  


Once shoes are attached, pair one front leg with one back leg and with right sides facing, sew along sides and bottom, leaving tops open.  Invert right side out and press.  


Stuff with polyfill to 1/2 inch from top.


(trick- a chopstick is a great tool for pushing out corners and for packing in polyfill!)


4. Sew two arms together, right sides facing, leaving tops open.  Invert, press and stuff with polyfill as with legs.


5. Sew two hair buns together, right sides facing, and stuff in a similar fashion.


6. Sew back of head to back of body, right sides facing.


Note: *If you want to make a non-pregnant doll, sew the face to the front body as in step 6 and skip ahead to step 9 .


7. Here is where it gets interesting.  Pay attention, people! 

To make our doll pregnant, we need to be able to tuck baby up inside between the body and dress, and need to add pleats to allow for expansion.

Take maternity dress piece (which is folded double), and fold both layers to the wrong side using the outer markings on the top to the markings on the bottom corners.  Press along folds.  Next, fold back in towards right side starting at inner markings at top.  Press again. This should cause the pleats to meet at the top center as shown. 


Note: in this photo at this angle, you cannot clearly see the excess fabric at the top center, where the pleats meet.  Also, the dress is layered here with the body piece (as described in step 8- see it extending beyond the bottom fold of the dress there?), so it does not easily illustrate how there are excess flaps at the bottom right and left of the dress.  Sorry about that!

Trim the excess at the top created by the folds as shown but LEAVE THE EXCESS AT THE BOTTOM.  We need that part.


Note: If you want to embellish the dress, as I did with the heart and hand stitching, now is the time!

8. Layer front body piece under pleated maternity dress piece, right sides up for each.  Place face right side down on top, aligning neck with raw edges of top of body and dress.  Sew all four layers (1 body, double for dress, 1 face) and press.


9.  Hand or machine baste arms, legs, and hair buns to front piece of body using a 1/8 inch seam.  If you would like to attach the baby to a string, baste the string at the same time between the legs. This allows more precise positioning and prevents shifting in the final assembly step. Note that the buns are attached on a curve, using piecing similar to a drunkard's path block.  If you are unfamiliar with this technique, I suggest you pop over to my blog and look at some instructions. here.


10. Fold all arms, legs and hair buns inward on the body, and align back piece, right side down, over top.


Tip:  I should tell you to pin here, but honestly, I didn't.  I had better results to sew it together in little segments, checking as I went.


11.  Sew along outsides of doll body, leaving a 2 inch gap at the top of the head.  Along the bottom (leg) area, you will be sewing the front and back body parts together, but only those extra corner flaps of the dress that we didn't trim in step 7.  The lower folded part of the dress should NOT be in this seam, or you will be unable to insert the baby into the belly later.


12. Invert doll right side out through hole.  Press.


13. Stuff doll with polyfill via head opening.


14. Hand stitch hole closed, and hand stitch facial features as desired. Apply pink dye for rosy cheeks.


To make baby:


1. Cut out baby pieces from template, choosing baby style option 1 or 2.


2. Sew face to body.  Embellish if desired (I added a heart).  Align front and back, right sides facing, and INSERT STRING FROM MAMA DOLL INTO BOTTOM OF BABY DOLL, with string passing inside between the two right sided layers and EXITING NEAR HEAD. Sew as for Mama doll, leaving a gap at top of head for turning, which has string passing through.


3. Invert and press.  Stuff with polyfill and hand sew gap closed.  Hand sew facial features.  Apply pink dye for rosy cheeks.


To make baby carrier:


Cut strip of fabric measuring 15" by 6".  Press in half along length.  Open, and fold hems along length by folding over 1/4 inch and 1/4 inch again to seam raw edges. Hand or machine sew along hem. With right sides facing, sew into a loop along short ends.  Refold in half.  Secure with a few stitches near seam.  Sling over Mama Doll's head and one arm and insert her baby between the folds!  Voila!


And that completes the instructions for making your own Pregnant Mama Doll.  If you have any questions, don't hesitate to contact me at ocdcrafter (at) gmail (dot) com.  Hope you enjoy!


Giveaway!


You could win 4 fat quarters of the Kona Cotton Solids Kristie used to make the Pregnant Mama Doll! 
Just leave a comment on this post for a chance to win.

If you are no-reply blogger please leave your email id in the post.
We will leave the giveaway open till Monday, March 18th 2013. Winner will be announced Tuesday, March 19th. Good luck everybody and enjoy making the doll!