Showing posts with label Kona Cotton Solids. Show all posts

Friday, August 21, 2015

Kona Club Challenge - Tropical Spin by Sandy from Upstairs Hobby Room


We're delighted to have Sandy from Upstairs Hobby Room take the Kona Club Challenge this month! Sandy has a great blog with lots of interesting projects, sew alongs, and giveaways! 

Sandy used the colors we sent out in February 2015 for Kona Club for her project today. We hope you enjoy this tutorial and make your own umbrella skirt for your patio table. We are giving away the fat quarters that Sandy used in this tutorial so be sure to leave a comment on this post to win!
Hi everyone, I'm Sandy from Upstairs Hobby Room! I'm a wife to my high school sweetheart, though we lived in different towns and didn't attend the same school. We just celebrated our 30th Wedding anniversary in July!  I'm a mother of 3 grown adults, a daughter and 2 sons, plus a son-in-law (no grand babies, yet), and I love country living. I have always loved crafting and creative outlets, and have sewn since I was about 11 or 12 years old, but I have only recently started quilting, about 3 ish years now.

I was super excited to be asked to join in on the Kona Club Challenge. I love Kona Cottons and I enjoy a good sewing challenge!!  I think I am still at the sponge stage, absorbing every new thing I can try, lol. Hope you are excited about the project and will try one for yourself, or maybe as BBQ host/hostess gift.  Happy sewing!

Tropical Spin


Tuesday, January 27, 2015

Kona Club Challenge - Flowering Table Runner by Lorna from Sew Fresh Quilts

Lorna from Sew Fresh Quilts took the Kona Club Challenge this month and made a beautiful table runner. Lorna is a prolific quilter and talented designer. Her blog is a treasure trove of projects, inspiration, tutorials and more! Make sure you follow her on Sew Fresh Quilts.

Lorna used the colors we sent out in April 2014 for Kona Club for her project today. We hope you enjoy this tutorial and make one of your own. We are giving away the fat quarters that Lorna used in this tutorial so be sure to leave a comment on this post to win!

Flowering Table Runner


Hello Kona Quilting Cottons lovers!  Are you up for the Kona Challenge?

My name is Lorna McMahon, a modern quilter, designer and the author of Sew Fresh Quilts.  Today I will be sharing the results of my Kona Challenge project and an easy tutorial for the Flowering Table Runner.   6 Blocks result in a finished runner approximately size 12” x 58”


Flowering Table Runner - 12" x 58"

Monday, September 22, 2014

Get Ready for our Kona Sale!!!


Are you excited about the Kona Sale??!
We are! 

If you've been to one of our sales before you'll know that we have a high volume of shoppers - both online and in the store. We will do everything we can to fill out your orders quickly and efficiently. You can help us do this by keeping a few things in mind when you shop online:

  • Orders are processed on a first-come, first-served basis.
  • Please be sure to provide specific instructions in the box titled : If we do not have the full quantity of an item on your order. For example you might say: " If you do not have the full 6 metres of the blue fabric please cancel that item but send the rest"; or "If you do not have the full 6 metres of the blue fabric cancel the whole order";  or "If you do not have the full 6 metres of the blue fabric please send a similar fabric of the same price. "
  • Please note that we will send what we have if you do not add specific instructions on your order.

We will have all hands on deck to ship your orders out to you as quickly and accurately as we possibly can. 

Tuesday, August 26, 2014

Kona Club Challenge - Boxy Pouch by Jennifer

 We're so happy to have Jennifer from A Quarter Inch from the Edge take the Kona Club Challenge this month. Jenn is a member of the Kona Club and love's solids. Jennifer used the colors we sent out in June 2013 for  Kona Club and made this great Boxy Pouch. We hope you enjoy this tutorial and make one of your own. We are giving away the fat quarters that Jennifer used in this tutorial so be sure to leave a comment on this post to win!

Don't forget to follow A Quarter Inch from the Edge for more inspiration and great projects!

Hi! I’m Jenn from A Quarter Inch from the Edge. I’ve been quilting for fourteen years and blogging about it for two! My blog, which began as a New Year’s Resolution, combines my love of writing, taking photos, and of course, quilting.  I live in Dartmouth, Nova Scotia and am a member of the newly formed Maritime Modern Quilt Guild. When I’m not quilting, I’m a Middle School French teacher and a life-long Girl Guide. I love Kona solids to the point of distraction and am so pleased to have been given the opportunity to write a tutorial for the Kona Club Challenge. I’ve been a member of Sew Sisters’ monthly Kona Club since January 2013 and love tearing into that squishy envelope every month to see what treasures await.

Friday, May 23, 2014

Kona Club Challenge - Tulip Tower Table/Sewing Machine Topper by Felicity

We're so excited to have Felicity from Felicity Quilts posting today! Felicity took the Kona Club Challenge this month. Felicity used the colors we sent out in March 2014 for  Kona Club and made this great Tulip Tower Table/Sewing Machine Topper! We hope you enjoy this tutorial and make one of your own! We are giving away the fat quarters that Felicity used in this tutorial so be sure to leave a comment on this post to win!

Don't forget to follow Felicity Quilts for more inspiration and great projects!

Tulip Tower Table/Sewing Machine Topper

Hi there - I'm Felicity and I blog over at Felicity Quilts. I was so happy when Sew Sisters - my favourite online fabric shop - approached me to participate in the Kona Club Challenge!

I was totally inspired by the photograph that accompanied the March 2014 Kona Club bundle - aren't those beautiful tulips? I created a mini quilt that features four graphic tulips, and my daughter declared its name Tulip Tower!

This 16½" x 24½" mini quilt can be a table topper, wall hanging or a machine topper.


Friday, October 11, 2013

Kona Club Challenge - Candy Dish Tutorial by Stacey Day


Stacey from Stacey in Stitches took the Kona Club Challenge this month.  Stacey used the colors we sent out in December 2012 for Kona Club and made this fun Candy Dish. We hope you enjoy this tutorial and make one of your own!

We are giving away the fat quarters that Stacey used in this tutorial so be sure to leave a comment on this post to win!

Candy Dish 

Hi, I’m Stacey from over at Stacey in Stitches. I am very excited to be a guest here at Sew Sisters, to share my Candy Dish tutorial! I live in Beautiful British Columbia with my husband, son, and slightly neurotic cat. I have been quilting and sewing since I was about 6. My grandma and mom taught me almost everything I know, and instilled a love of art in me that manifests itself in quilting. I have my diploma in Fashion Production from Olds College, and I dabble in knitting, crochet, and watercolour. I started blogging last year when my son was born, and I am so inspired by the myriad of talented quilters and fiber artists out there! I am also a member of the Vancouver Modern Quilt Guild.

It’s that time of year again when the stores start selling a yummy assortment of candy and snack size chocolates bars in preparation for the holiday season that kicks off at Halloween and doesn't stop until just after New Year's. With all the entertaining to be done, why not keep the crystal in the cupboard and show off your superb sewing skills with a set of quilted candy dishes? They are easy to make and give away as gifts, and can be made for every candy-filled holiday throughout the year, from Halloween and Christmas, to Valentines Day and Easter. The template can be enlarged or shrunk for a great variety of sizes, and you can utilize some of the fancy stitches on your machine to sew wedges together.


Friday, October 4, 2013

New Kona Colors!


Don't the new Kona Colors make you happy? Lots of beautiful grays, blues, and oranges to choose from.
We’ve added the new colors to our shelves so get them all!
Click here to purchase: New Kona Cotton Solids
We have a limited number of Kona Solids - Roll Ups on sale. Click here to check them out: Kona Solids - Roll Ups on Sale.

Friday, September 13, 2013

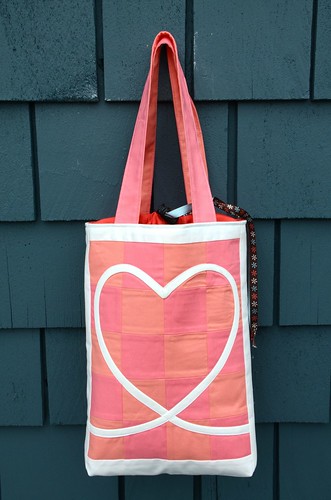
Kona Club Challenge - Ballet Tote by Krista from Poppyprint

Krista from Poppyprint took the Kona Club Challenge this month. Krista used the colors we sent out in April 2013 for Kona Club and made this adorable Ballet Tote. We hope you enjoy this tutorial and make one of your own!

We are giving away the fat quarters that Krista used in this tutorial so be sure to leave a comment on this post to win!

Krista Hennebury sews and quilts in her little home studio in North Vancouver. She began quilting 12 years ago as a creative outlet after her two children came along.  She blogs at www.poppyprintcreates.blogspot.com sharing tutorials and travel photography, teaches workshops, runs a popular day-retreat business and is an active member of the Lions Gate Quilters Guild and the Vancouver Modern Quilt Guild. Her work has appeared in Quilters Connection, Fat Quarterly and Stitch magazines as well as Modern Quilt Blocks. She's currently working on an e-book sharing her knowledge with others who wish to start a retreat business in their community.

Ballet Tote

Finished size 8" x 12" x 2"
It's not just back to school this fall - it is back to ballet, too! Send your ballerina off in style with this sweet Ballet Tote featuring Sew Sisters' lovely April Kona Solids FQ set.  I designed this tote with my sister and nieces in mind; they've recently taken over Demi Pointe, a dance shop in Charlottetown, PEI. I've adapted a machine applique technique by Karen Soltys in "Applique Made Easy" from Rodale to make the scripted heart.  If the applique is too daunting, just skip it, or add a fusible appliqued monogram instead!

Ballet Tote Tute by Poppyprint

Please read through the tutorial and have a look at the photos prior to cutting or sewing anything!

Friday, August 9, 2013

Kona Club Challenge - Modern Labyrinth Trivet by Leanne from She Can Quilt

We're so happy to have Leanne from she can quilt on the Kona Club Challenge this month. Leanne used the colors we sent out in February 2012 for Kona Club and made this lovely Modern Labyrinth Trivet. We hope you enjoy this tutorial and make one of your own!

We are giving away the fat quarters that Leanne used in this tutorial so be sure to leave a comment on this post to win!


Modern Labyrinth Trivet 


I'm Leanne and I have been blogging about quilting at she can quilt for about 2.5 years - do stop by my blog to visit if you have a minute. I live in Edmonton, Alberta and I also spend time at our little acreage on one of the Gulf Islands. I have been sewing, knitting, and embroidering all my life and I also weave and crochet. I began quilting about 3.5 years ago, and now, when I am not working or taking care of my family, I spend as much time as I can quilting.


Tuesday, July 16, 2013

Kona Club Challenge July Giveaway Winner!

The Winner of the Kona Club Challenge - Giveaway is:

---------------------------------------------------------------------------

62. Shannon said...
Wonderful! And thanks for the link for hand quilting - I knew I was doing something wrong and now I know what it is! Yahoo!!

--------------------------------------------------------------------------

Congratulations Shannon!

We've emailed you. You can also write to us with your postal address at connect@sew-sisters.com.


Many thanks to Carla from  Cora Quilts  for this awesome tutorial!

Friday, June 14, 2013

Kona Club Challenge - Quilted Fabric Basket by Tabatha @ Bending Pins

Tabatha  from Bending Pins took the Kona Club Challenge this month. Tabatha used the colors we sent out in September 2012 for Kona Club and made this fun and useful Quilted Fabric Basket. Make one of these to store all your sewing supplies and pretty up your home using this great tutorial! Leave a comment on this post for a chance to win the fat quarters used in this project! 

Quilted Fabric Basket


Tabatha & Cookie
I started sewing clothes as a teen, as many did in home ec class then attended Champlain College and the Ottawa School of Art in the fine arts of painting, printing and sculpting. My mother taught arts and crafts at our local summer camp, and taught me how to knit and crochet. My father is also very crafty, his main passion is wood working but has also dabbled in stained glass and leather work. I'm the only child of three who has inherited my parent's love of creating. Quilting is a relatively new passion which started a year and a half ago, following in the footsteps of my paternal grandmother, who was, in my opinion, a master quilter. I can only hope to live up to her talents one day.

Baskets can be used for a plethora of tasks, I like to use mine to transport items that need hand finishing from my sewing room in the basement, to the living room on the main floor, where I can hand sew while watching T.V. I also use my quilted baskets to hold magazines or even so that items in my car don't roll around or get lost.
For this example, I used 5 log cabin blocks 10 & 1/2” x 10 & 1/2” and 5 improv blocks. You can use any 5 quilt blocks you like or simply cut 10 pieces of fabric, 5 pieces for the exterior and 5 pieces for the interior.


** PLEASE READ ALL INSTRUCTIONS BEFORE CUTTING FABRIC AND SEWING **
(Once you know how this goes together, you may wish to change your fabric and there are construction options.)

Friday, May 10, 2013

Kona Club Challenge - Tangram Pillow by Deanna Doornbos

Deanna from Little D and Me took the Kona Club Challenge this month and here is what she came up with! Deanna used the colors we sent out in January for Kona Club. Make this lovely Tangram Pillow and leave a comment on this post for a chance to win these lovely fat quarters!


Tangram Pillow

I’m Deanna Doornbos and I blog at Little D and Me. I’m based in a small town north of Edmonton, AB, and have been dabbling in quilting for about 2 years now.  I started sewing when my daughter, Little D, was born three years ago. I taught myself to make clothes for her, drafting patterns based on clothes she had and tutorials from other bloggers.  My sewing has greatly improved since then - I've learned so much from others!  I still sew a lot of clothes and have an Etsy shop where I sell dresses, but I've also caught the quilting bug.

When I was contacted by Sew Sisters to make a tutorial for them using one of their Kona bundles, I was nervous because I'd never made or even tried to make a tutorial before.  But since I love a challenge, I accepted and chose the Kona January bundle for the blue, a favourite colour of mine.  I chose to make a pillow cover because I love that pillow covers give you the chance to make quilt blocks without making a whole quilt.  I love points and angles right now, so when thinking about a design, I looked for something with different angles rather than all one shape.  The Tangram puzzle came to mind and the challenge came to put the puzzle into fabric.

You will need:

Cutting Directions:

*because we are working with bias cuts I suggest starching your fabrics before cutting* 
Set aside the square of Lake.
Cut the remaining squares in half as triangles.  From each, set aside one half and keep one half.


From the rectangle of Pacific, cut off a 4 inch triangle as shown, so you end up with a parallelogram.


Instructions:

 *all seams are a scant 1/4 inch*
 *since we are working with bias cuts, you may need to ease fabrics into the right measurement, that's okay*

1. The pillow top is made of units that will get put together. The first unit is simply a triangle and a strip of Ash.
  • Measure and mark 0 and 11 inches on a strip of Ash.   Match the marks to the points on the long side of the larger triangle of Water.
  • Press toward the blue. 


2. The second unit will be these pieces joined together.


  • For the parallelogram, on a strip of Ash make a small mark with an erasable pen at the 0 and 8 1/4 inch mark.  

  • Match up the side of the parallelogram, as shown in the photo above, to the marked strip, keeping the points on the marks. Pin and sew, easing the pieces together if necessary.
  • Press toward the blue.
  • Do the same with the triangle of Algeria and the square of Lake, marking, pinning and sewing.

  • Now join these three plus the small triangle of Water together.

  • You will probably have to trim the small side of this strip. Just measure 1/4 inch from the circled joint of the Lake square and Ash strip and trim a straight line.  You should only have to trim the Pacific parallelogram.
I pressed seams towards the blue, except one, simply to keep bulk down.


3. Now join the strip we just made to the triangle of Water.

A trick I used to get the parts lined up together is to first press down a quarter inch of the Ash strip that's on the triangle of Water.  When it's folded over, snip off the corner bit and then when lining up the pieced strip, the angle of the strip of Ash should match up to the straightedge of the parallelogram.

  • Press the seam up towards the Ash.
You should now have this:


Don't worry if things look a bit wobbly - it's because we sewed some pieces on the bias.

4. The last part to piece together are the two large triangles.


  • Line up and sew the large triangle of Water to a strip of Ash.
  • Trim the Ash as shown and line up the triangle of Pacific even with the straight edge of the triangle with strip attached.

5. The two halves have to be sewn together now.
  • Take the longest strip of Ash cut from the long side of the FQ and sew it on to the two large triangles.


  • To make sure we line up the to halves on the center line, mark the strip of Ash on the long strip so we can match it up to the strip of the other half.

  • Match up the marks to the strip, ease together so the ends also match properly, pin and sew.
You now have the hard part done.
Because we've sewed on the bias, our block is a bit wobbly, so take some pattern weights (I use washers) and ease the block into a 15.5 inch square.  Trim.


As you can see, I had to trim of some blue on the bottom as well.

6. Once you've trimmed the block, we're going to sew on the 1 inch Ash strips.
  • Ease two sides into the 15.5 inch strips, pin and sew.
  • Do the same for the other side, easing the block onto the 16.5 inch strips.
Your pillow top is now done!  It should measure 16.5 inches square.


Quilt the top as you'd like using the 17 inch squares of lightweight low-loft batting and backing fabric.  Trim to 16.5 inches.

7. For the back of the cover, I chose to do a zipper because I think it looks neat and clean and it's pretty simple to do.  I won't reinvent the wheel here, but instead direct you to a great tutorial for zipper backs here at Sew Mama Sew.

I chose to piece together some random leftover bits for one half and then I used leftover Ash for the other half.  For the zipper flap I used a strip of Lake.  I always like to choose a longer zipper than I really need, just because I like to trim off the metal bits.


Because I had pieced the bottom, I backed it with some fabric to protect all the seams.  I did the same to the top piece of Ash, just because I like a good and sturdy cover.

Follow the tutorial and you should end up with this:

Don't trim the zipper ends yet.

Open up the zipper half way and match up the top to the back and pin in place and sew with a 1/4 inch seam allowance.  Clip the corners and turn it right side out.  Stuff it with a 16" pillow form and you're done!


Admire your new pillow and throw it on a chair.


Giveaway!

You could win 4 fat quarters of the Kona Cotton Solids Deanna used to make her Tangram Pillow! 
Just leave a comment on this post for a chance to win.

Deanna chose the colors we sent out in January this year to our Kona Club members. 

If you are no-reply blogger please leave your email id in the post.
We will leave the giveaway open till Tuesday May 14th, 2013. Winner will be announced Wednesday, May 15th. Good luck everybody and enjoy making your very own Tangram Pillow! 

Friday, March 15, 2013

Welcome to the very first Kona Club Challenge Tutorial!


Here it is! The very first Kona Club Challenge Tutorial!

If you haven't read about the Kona Club Challenge it's a little something we started here at Sew Sisters. Since we send delicious Kona Solids each month to our Kona Club members, we thought it would be fun to share tutorials for projects using those solids. 

We approached quilting bloggers from the wonderful blogging universe and "challenged" them to design and create a project and a tutorial using four fat quarters from the Kona Solids we have sent out each month on Kona Club. 


Photo by Glass Eye Photography
Our first Kona Club Challenge went out to Kristie Maslow at OCD: obsessive crafting disorder and she graciously accepted. Kristie has a wonderful blog with lots of great projects, tutorials, and funny stories about her four (including Bailey of course)  gorgeous kids. Her blog always leaves us feeling happy and playful and we're so excited to have her be a guest blogger on the Kona Club Challenge. Kristie also  just had her first, all Canadian Quilt Pattern come out this month. You can find it here: The Good Old Hockey Game Quilt Pattern.

Kristie chose the Kona Solids we sent out in August 2012 and here's what she came up with! Enjoy this fun tutorial and be sure to enter the giveaway at the end of the post. 


Pregnant Mama Doll Tutorial 


 by Kristie Maslow at OCD: obsessive crafting disorder
*for personal use only

When I was asked by Sew Sisters Quilt Shop to participate in the Kona Solids Challenge, I was at a bit of a loss as to what to do.  While I constantly admire the works of others in solids, I find that I tend towards prints myself.  So, given 4 solids to work with and asked to produce a project, I was surprised how quickly inspiration came to me!  Perhaps it was the fleshy tone of the Kona Butter, or the happy Kona Corn Yellow, but immediately I thought they were perfect to make dolls for my daughters.  And then I recalled a "pregnant" doll that I had seen in cyberspace at some point, and I knew exactly what to do!  This doll is perfect for all little girls who what to be like their Moms, and would make the perfect gift for a "big sister" or "big brother" to-be!


The Baby doll tucks up inside under the dress to make the Mama "pregnant"....


You have the option to add Baby to a string (I know my daughters would loose it, otherwise!).


I also added instructions for a little baby sling to help Mama Doll tote Baby around.


The pattern can be modified to create a non-pregnant female doll by omitting the baby and maternity dress, or why not make a little boy doll by also leaving out the buns?  There are many options, choose one to suit you!


Let's get started!

Materials Required:
  • Pattern pieces (Click here to download pdf)
  • A fat quarter each of Kona Cotton Solids in Corn Yellow, Peacock and Navy, and 2 fat quarters or .5 metres of Kona Butter
  • Polyfill
  • Embroidery thread or Pearle 8 thread for facial features
  • Coordinating thread
  • Scraps of paper-backed two-sided iron-on adhesive (I used Pellon Wonder Under)
  • Dye-based ink (for "rosy cheeks", optional)
  • Scrap of yarn or ribbon, approximately 8 inches long (optional)
  • Embellishments such as buttons, lace, etc. (optional)

Instructions:
Notes:
*This pattern can be simplified by omitting the baby and pregnancy option, resulting in a really sweet doll all on its own!
*all seams at 1/4 inch, not the traditional 1/2 inch, because I am a quilter and can't learn new tricks :)
*press all seams to dark colored side

1.  Print out pattern pages with no scaling, using 1 inch boxes provided on each page to ensure they are to size.  Cut all pattern pieces from fabric as required. Instructions for number of pieces to cut are on each piece.  Transfer marks as indicated.  


Iron adhesive to back of front hair piece prior to cutting.


2. Peel paper off hair piece and press onto butter face piece.  Hand or machine stitch  edges to secure.


Note: * the face also needs some stitched personalization, but I waited until the very end to do this so that I could better see the shape of the head to make it look good!


3. Sew 4 shoes to 4 legs.  To make Mary Jane style shoes, cut 2 shoe pieces, 1 inch from top (straight) edge, and insert butter additional piece.  


Once shoes are attached, pair one front leg with one back leg and with right sides facing, sew along sides and bottom, leaving tops open.  Invert right side out and press.  


Stuff with polyfill to 1/2 inch from top.


(trick- a chopstick is a great tool for pushing out corners and for packing in polyfill!)


4. Sew two arms together, right sides facing, leaving tops open.  Invert, press and stuff with polyfill as with legs.


5. Sew two hair buns together, right sides facing, and stuff in a similar fashion.


6. Sew back of head to back of body, right sides facing.


Note: *If you want to make a non-pregnant doll, sew the face to the front body as in step 6 and skip ahead to step 9 .


7. Here is where it gets interesting.  Pay attention, people! 

To make our doll pregnant, we need to be able to tuck baby up inside between the body and dress, and need to add pleats to allow for expansion.

Take maternity dress piece (which is folded double), and fold both layers to the wrong side using the outer markings on the top to the markings on the bottom corners.  Press along folds.  Next, fold back in towards right side starting at inner markings at top.  Press again. This should cause the pleats to meet at the top center as shown. 


Note: in this photo at this angle, you cannot clearly see the excess fabric at the top center, where the pleats meet.  Also, the dress is layered here with the body piece (as described in step 8- see it extending beyond the bottom fold of the dress there?), so it does not easily illustrate how there are excess flaps at the bottom right and left of the dress.  Sorry about that!

Trim the excess at the top created by the folds as shown but LEAVE THE EXCESS AT THE BOTTOM.  We need that part.


Note: If you want to embellish the dress, as I did with the heart and hand stitching, now is the time!

8. Layer front body piece under pleated maternity dress piece, right sides up for each.  Place face right side down on top, aligning neck with raw edges of top of body and dress.  Sew all four layers (1 body, double for dress, 1 face) and press.


9.  Hand or machine baste arms, legs, and hair buns to front piece of body using a 1/8 inch seam.  If you would like to attach the baby to a string, baste the string at the same time between the legs. This allows more precise positioning and prevents shifting in the final assembly step. Note that the buns are attached on a curve, using piecing similar to a drunkard's path block.  If you are unfamiliar with this technique, I suggest you pop over to my blog and look at some instructions. here.


10. Fold all arms, legs and hair buns inward on the body, and align back piece, right side down, over top.


Tip:  I should tell you to pin here, but honestly, I didn't.  I had better results to sew it together in little segments, checking as I went.


11.  Sew along outsides of doll body, leaving a 2 inch gap at the top of the head.  Along the bottom (leg) area, you will be sewing the front and back body parts together, but only those extra corner flaps of the dress that we didn't trim in step 7.  The lower folded part of the dress should NOT be in this seam, or you will be unable to insert the baby into the belly later.


12. Invert doll right side out through hole.  Press.


13. Stuff doll with polyfill via head opening.


14. Hand stitch hole closed, and hand stitch facial features as desired. Apply pink dye for rosy cheeks.


To make baby:


1. Cut out baby pieces from template, choosing baby style option 1 or 2.


2. Sew face to body.  Embellish if desired (I added a heart).  Align front and back, right sides facing, and INSERT STRING FROM MAMA DOLL INTO BOTTOM OF BABY DOLL, with string passing inside between the two right sided layers and EXITING NEAR HEAD. Sew as for Mama doll, leaving a gap at top of head for turning, which has string passing through.


3. Invert and press.  Stuff with polyfill and hand sew gap closed.  Hand sew facial features.  Apply pink dye for rosy cheeks.


To make baby carrier:


Cut strip of fabric measuring 15" by 6".  Press in half along length.  Open, and fold hems along length by folding over 1/4 inch and 1/4 inch again to seam raw edges. Hand or machine sew along hem. With right sides facing, sew into a loop along short ends.  Refold in half.  Secure with a few stitches near seam.  Sling over Mama Doll's head and one arm and insert her baby between the folds!  Voila!


And that completes the instructions for making your own Pregnant Mama Doll.  If you have any questions, don't hesitate to contact me at ocdcrafter (at) gmail (dot) com.  Hope you enjoy!


Giveaway!


You could win 4 fat quarters of the Kona Cotton Solids Kristie used to make the Pregnant Mama Doll! 
Just leave a comment on this post for a chance to win.

If you are no-reply blogger please leave your email id in the post.
We will leave the giveaway open till Monday, March 18th 2013. Winner will be announced Tuesday, March 19th. Good luck everybody and enjoy making the doll!