
 We're delighted to have Shena from Apple Pie Patchwork take the Kona Club Challenge this month! Shena does gorgeous work and has won awards for her quilts! Make sure you follow her blog for more tutorials and inspiration!
 Shena used the colors we sent out in April 2015 for Kona Club for her project today. We hope you enjoy this tutorial and make your own table topper. We are giving away the fat quarters that Shena used in this tutorial so be sure to leave a comment on this post to win!
Tea Room Table Topper
Hello! My name is Shena and I typically blog at Apple Pie Patchwork. I live in Lethbridge, Alberta, and I'm a founder and the president of the local MQG. I was contacted by Sew Sisters and asked to write a tutorial for a project that could be made using one of their Kona Club packs. Eventually I settled on this table topper. I was inspired by a window that I saw in an older local building that is now a tea room, and decided to try and re-create it.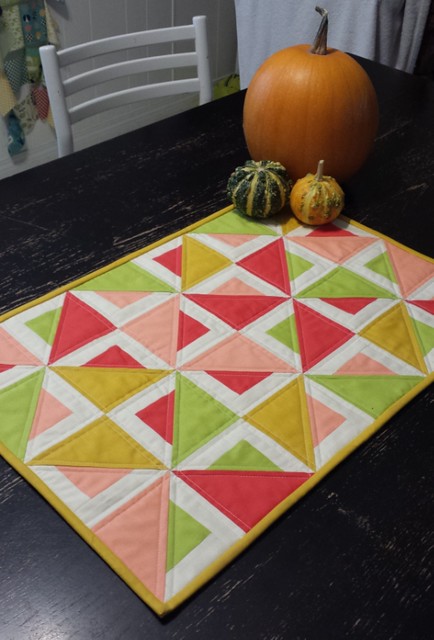 |
Ready to get started? This is the Kona Club pack I chose and picked the Kona Bone to go with it. The colours are, from left to right, Kona - Creamsicle, Kona - Watermelon, Kona - Limelight, and Kona - Grellow.
 |
Cutting Instructions:
Begin with cutting the Kona Bone: Cut 10 (ten) 1.5"x21" strips. Subcut 6 (six) strips into 24 (twenty-four) 1.5"x5" rectangles Subcut 4 (four) strips into 24 (twenty-four) 1.5"x3" rectangles
Then you have to decide which of the four remaining colours you would like to use as your binding. I chose Grellow. You will cut only one strip from this fabric. Pay close attention to the way you orient the fabric as you cut, to ensure that you have enough left over for your binding.
From the Kona Grellow cut: 1 (one) strip 5"x18" (make sure to cut the 18" length, NOT the 21" length) Subcut this strip into 3 (three) 5" squares Your remaining piece should measure approximately 16"x18" From this piece cut: 7 (seven) strips 2.5"x16" for binding. Set aside for now.
Now layer the three remaining colours - Creamsicle, Watermelon, and Limelight. Again, watch the orientation to ensure you cut the correct length. Otherwise you will not have enough leftover for your backing.
From each of Creamsicle, Watermelon, and Limelight cut: 1 (one) strip 5"x18" Subcut this strip into 3 (three) 5" squares 1 (one) strip 3"x18" Subcut this strip into 4 (four) 3" squares Your leftover pieces should measure approximately 13"x18". Set these aside for backing.
 |
After you are done cutting, this is what you should have. Binding strips not pictured.
Sewing Instructions:
Take your 3" squares and sew a 1.5"x3" strip to each side. Press open.
Take your 5"x1.5" strips and sew them to the top and bottom of your unit. Press open.
 |
Mark the centre diagonal and layer RST with your 5" units. Stitch 1/4" away from the marked line on each side.
Cut on the marked line and press the HSTs towards the dark fabric.
 |
 |
Stitch together with a 1/4" seam. Make 6 (six) blocks. Blocks should measure 8.5".
 |
Your top should measure 16.5"x24.5".
 |
Baste and quilt as desired. I used a walking foot to straight stitch 1/4" away from each long seam line. It made beautiful stars in the centres of the pinwheels.
Bind with the 2.5" strips of Grellow.
 |
 |
Enjoy your beautiful new table topper! I hope you enjoyed this project.
Thanks for stopping by!
 |
Giveaway!
You could win 4 fat quarters of the Kona Cotton Solids Shena used in this project!
Just leave a comment on this post for a chance to win.

Just leave a comment on this post for a chance to win.

If you are no-reply/Wordpress blogger please leave your email id in the post.
We will leave the giveaway open till Monday, October 26.
Winner will be announced Tuesday, October 27.
Good luck!
Many thanks to Shena from Apple Pie Patchwork for this great tutorial!
Click here for more details on Kona Club.
Winner will be announced Tuesday, October 27.
Good luck!
Many thanks to Shena from Apple Pie Patchwork for this great tutorial!
Click here for more details on Kona Club.


